Hvis der er noget du ikke lige synes du kan visualisere ordenligt på en Zabbix…
Hjælp til genvej til hjemmeside på iOS
 Det er muligt på iOS enheder at lave genveje på home screen, men det er tit ikke så nemt for brugerene at huske hvordan 🙂 så derfor kan man lave nogle hints til at få dem til at lave genvejen.
Jeg faldt over et javascript som kunne gøre dette meget nemt. Det er kommet til mit kendskab at det også bliver brugt på TV2.dk.
Hjemmesiden med scriptet findes her.
Som det første skal du downloade scriptet og smide filerne på web serveren. Når det er gjort så skal der tilføjes et par linier til headeren på siden.
[code] <link href="sti/til/add2home.css" rel="stylesheet" /><script type="application/javascript" src="sti/til/add2home.js"></script>[/code]
Der er forkellige configurations muligheder. De sættes i en global JS variabel som skal sættes ind før include af javascriptet:
- autostart: should the balloon be automatically initiated? Default: true.
- returningVisitor: show the message to returning visitors only. Set this to
trueand the message won’t be shown the first time an user visits your site. Default: false.
- animationIn: the animation the balloon appears with. Can be:
drop,bubbleandfade. Default: drop.
- animationOut: the animation the balloon exits with. Can be:
drop,bubbleandfade. Default: fade.
- startDelay: milliseconds to wait before showing the message. Default: 2000
- lifespan: milliseconds to wait before hiding the message. Default: 20000
- bottomOffset: distance in pixels from the bottom (iPhone) or the top (iPad). Default: 14
- expire: minutes before displaying the message again. If you don’t want to show the message at each and every page load, you can set a timeframe in minutes. The message will be shown only one time inside that timeframe. Default: 0 (=always show).
- message: Define a custom message to display OR set a fixed locale. If you don’t like the default message we have chosen for you, you can add your own. You can also force a language by passing the respective locale (eg: ‘en_us’ will always display the English message). Default: ” (=script decides).
- touchIcon: if set to
true, the script checks forlink rel="apple-touch-icon"in the pageHEADand displays the application icon next to the message. Default: false.
- arrow: shows the little arrow pointing the bottom bar “add” icon. For custom designs you may want to disable it (ie: set it to
false). Default: true.
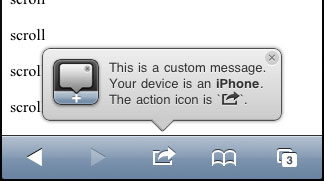
Eksempel kunne se sådan ud:
[code]<script type=""text/javascript">// <![CDATA[var addToHomeConfig = {
animationIn: ‘bubble’,
animationOut: ‘drop’,
lifespan:10000,
expire:2,
touchIcon:true,
message:’This is a custom message. Your device is an <strong>%device</strong>. The action icon is `%icon`.’
};
// ]]></script>
[/code]
Når brugeren tilføjer siden vil der kommet et screen dump af hjemmesiden som ikon, med mindre man selv laver et ikon.
Den nemmeste måde at få et ikon på er ved at lave et billede som er 150px x 150px og ligge billedet i roden på web serveren. Filen skal hedde apple-touch-icon-precomposed.png
Hvis du ikke vil have at iOS laver skygger osv. skal du lave 3 forskellige ikoner.
iPhone standard ikon (57 x 57 pixels) apple-touch-icon-57×57-precomposed.png
iPhone Retina Display ikon (114 x 114 pixels) apple-touch-icon-114×114-precomposed.png
iPad ikon (72 x 72 pixels) apple-touch-icon-72×72-precomposed.png
Hvis du vil selv vil definere stien eller have flere forskellige ikoner på undersider, skal du definere ikonerne i head sektionen i din html kode. For at define den simple skal du bruge følgende kode:
[code] <link href="my_icons/my_icon_file_path.png" rel="apple-touch-icon" />[/code]
For at ikoner uden skygger osv:
[code] <link href="apple-touch-icon-iphone.png" rel="apple-touch-icon" /><link href="apple-touch-icon-ipad.png" rel="apple-touch-icon" sizes="72×72" />
<link href="apple-touch-icon-iphone-retina-display.png" rel="apple-touch-icon" sizes="114×114" />
[/code]
For at få vist ikonet i den bubble hjælpe box som kommer frem skal du benytte touchIcon:true i konfigurationen.
Relaterede indlæg

Comments (1)
Skriv et svar
Du skal være logget ind for at skrive en kommentar.
[…] For nogle dage siden skrev jeg om hvordan man simpelt kunne kode lidt hjælp til at lave genveje i iOS til sin hjemmeside; Hjælp til genvej til hjemmeside på iOS. […]